Friday, December 31, 2021

2 x Xmas ( Buzzer & Speaker )

 As i have some of this cheap audio modules i wanted to heard the difference between using a buzzer and a (cheap mini) speaker. I used two similar audio modules soldered a buzzer to one and a small speaker to the other. I recorded a video to let you hear the sound using the same battery and settings on my phone.  You can hear the difference, however a buzzer is much more cheaper and as the 'music' from the module are just beeps it is much cheaper to to use the buzzer. For powering the module i used a my ÇR2032 Lithium Cell Battery "power station'.
I did screw up a part of the video as i later applied a video effect to a part of the video that also changed the audio. However there is sufficient 'untouched' audio to hear it.
If you do no want to watch the full 2.50 video here is what you can expect: 0:00 Intro 0:18 Buzzer 1:13 Speaker


The audio module is a PX088A module using a potted music chip.  "DIY Sound Module For Toy Christmas Song Music Voice Module Sound Chip Loop Play For DIY/Toy Jingle Bells 3-4.5V" and can e.g. be found on Aliexpress.
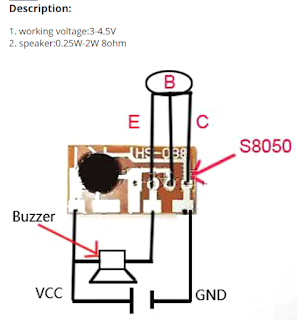
This module is also available with some other sounds. (Alice Music, Ding Dong, Bird chirp ) Unfortunately, if you have several different modules, the sound is not marked on the outside and you need to test it. Strangely there is a similar looking module marked LX9300H with a happy birthday song. An A8050 transistor (or equivalent) , a buzzer or speaker and a power source is needed to get it working using the diagram below.
It was a bit confusing that module on the circuit diagram a different number on it than the sold module: HS-088.  


Also you can find different schematics for this module ( e.g. https://leap.tardate.com/audio/audioeffectschips/px088a/ ) that i did not tried yet.
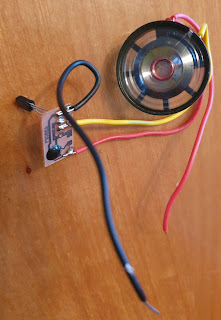
Module with mini speaker

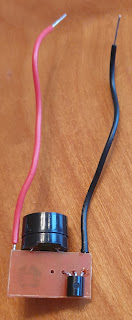
Module with buzzer (back)
Module with buzzer (front)


The ÇR2032 Lithium Cell Battery "power station' that i build some time ago is just a  CR2032 battery holder, a switch and some connectors on a small veroboard. It also has some plastic stands to put it on your desk. It has helped me a lot when building and testing small projects like this.
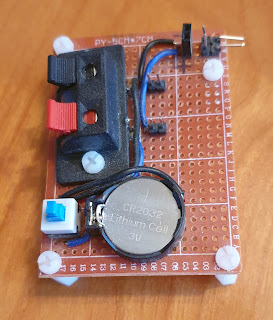
"CR2032 power station" 

Some links

Wednesday, November 10, 2021

Mailbag 10 November 2021


In my mail today a new FPGA board to play with. This is a Lattice ICEstick ICE40HX1K-STICK-EVN .
For this FPGA free software and several demo applications are available.  Also DigiKey recently posted on YouTube a video  Introduction to FPGA Part 1 - What is an FPGA? | Digi-Key Electronics , a video in a new series of videos where this FPGA will be used.

Normaly i need to wait minimal 10 day before i receive items when ordering things (as i often order items using Aliexpress in China). This item was not ordered in China and came almost within 48 hours. The device was packaged using an extreme amount of packaging material.
I hope to find soon time to start testing and using it as it seemed to me an interesting  addition to my "FPGA collection".

I already have two other FPGA boards, a EP2C5T144 Altera Cyclone ii and a Cyclone IV board with several IO.
So this is my third FPGA board. 
Besides possibilities to interface your own hardware there is also interesting hardware on the board to play with e.g. 5 Leds and the IrDA transceiver.
The board looks like a big USB plug and can be plugged in directly in a free USB slot. (However it is recommended to use a USB cable as this will make it more easy to experiment.)
Currently i am also working on some other interesting projects, however starting with this FPGA board is a temptation.

Sunday, October 17, 2021

2021 Mailbag

Here another Mailbag post.

I received more items in my mailbag and this are items i received in Q2 of 2021. During that time i already started writing this blog article, however due to other priorities i did not post it yet. So in fact the text is already a bit outdated when posting this mid October 2021 but perhaps still interesting.     
Some of the items i ordered during the last months are for my some longer term plans for a new shed / workspace. So it can take a while before i am going to use them. As i only place orders in China below 22 euro's (due to tax regulations) i decided to order items step by step.


These wire connectors i never used before.
It is used to add a connection to an existing wire e.g. for an additional socket.
This is also something i never used before and when is did see a video using it it looked interesting so i want to try it.
It is a set of tubes like shrinking tube with in the middle some solder. It is used to connect two wires. You put the wires in from both sides. Heath the tube and the solder should flow to connect the wires and also the tube shrinks. This way you can easy connect two wires. 
This are some 12V car sockets. In my new workspace (that currently only exist as a plan) i want to add some of this connectors with 12V to power projects or do experiments.
The nice thing is there is a cap in front of the connector to close the big opening. 

Monday, May 24, 2021

Easy module shield -1- (Arduino)

Recently i received another Arduino sensor shield.
It has a reset button and two other push buttons several other sensors.There are some Dupont pins available to add something of your own (e.g. an IR led).

D0( RX see below )
D1( TX see below )
D2SW1 (push button)
D3SW2 (push button)
D4DHT11
D5Buzzer
D6IR receiver
D7(pins with D7 VCC GND)
D8(pins with D7 VCC GND)
D9RGB led (R?)
D10RGB led (R?)
D11RGB led (R?)
D12Led Red D1
D13Led Blue D2
A0Rotation (pot)
A1LDR (Light sensor)
A2LM35 (temeprature sensor)
A3(pins with A3 VCC GND)
A4( I2C SDA see below )
A5( I2C SCL see below )
SDA SCL(pins GND VCC SDA SCL)
TX RX(pins with TX RX VCC GND)
ResetReset button
(power)Power Led


Some names that i have seen for this shield are
Easy module shield
Multifunction (multisensor) Shield Arduino Uno
Multifunction DHT11 LM35 Temperature Humidity Easy Module Shield for Arduino UNO
Multifunction Expansion Board DHT11 LM35 Temperature Humidity For Arduino UNO

The interesting of this relative cheap board is that it contains several hardware items to play with as an  Arduino shield so you do not need to wire these components.

Schematics and some examples can be found at http://www.getmicros.net/a-look-at-the-easy-module-shield-for-arduino.php

As i have seen several times interesting information disappear i placed a copy of the schematics here on my blog. (For the code there are also other resources). 

Perhaps in the future i will post some code examples and experiments you can do with this shield. With the LM35 i did not play before. Also i did read about some problems with the Infrared led on a version of this shield. So i hope i will find time soon to play with this board.

Sunday, May 23, 2021

Arduino Relay Shield

This blogpost is about the Arduino relay shield from my 2021 May Mailbag.
It contains 4 relays and provides NO (Normally Open) / NC (Normally Closed) interface and leds showing the state of the relay.

It uses I/O pins 7,6,5 and 4 for relays 1,2,3 and 4. 
The screw terminals for the relay contacts. However the terminals from one of the relays is not very safe due to the position near the metal USB connector on the Arduino !


On https://www.seeedstudio.com/Relay-Shield-v3-0.html there is this diagram showing the connections:

One bad design issue of this shield is that some screw terminal pins (J1) make contact with the metal USB connector of the Arduino. So it is needed to add some protect, at least 2 layers of insulation tape is recommended in articles i found on internet!
Working with main voltage (220V) on the screw terminals is dangerous and having a connection to the metal USB connector is asking for problems!
As i want to stay safe i decided to do it different and did put long pin connectors between the Arduino an this shield. This gives more space between the screw connectors and the metal USB as i expect this is really needed for safety. 

To test this shield i modified a simple Arduino blink example sketch.
The interval was extended to 4000 as for the relay a slower on and off switching time would be more appropriate.
Also the pin number was changed to check if the digital pins 4,5,6 and 7 are the correct one's. And indeed this are the channels. When switching the corresponding led blinks and it is possible to hear the clicking of the relay. (also the connection can be measured with ohm meter.)

/*
  Blink without Delay

  Turns on and off a light emitting diode (LED) connected to a digital pin,
  without using the delay() function. This means that other code can run at the
  same time without being interrupted by the LED code.

  The circuit:
  - Use the onboard LED.
  - Note: Most Arduinos have an on-board LED you can control. On the UNO, MEGA
    and ZERO it is attached to digital pin 13, on MKR1000 on pin 6. LED_BUILTIN
    is set to the correct LED pin independent of which board is used.
    If you want to know what pin the on-board LED is connected to on your
    Arduino model, check the Technical Specs of your board at:
    https://www.arduino.cc/en/Main/Products

  created 2005
  by David A. Mellis
  modified 8 Feb 2010
  by Paul Stoffregen
  modified 11 Nov 2013
  by Scott Fitzgerald
  modified 9 Jan 2017
  by Arturo Guadalupi

  This example code is in the public domain.

  http://www.arduino.cc/en/Tutorial/BlinkWithoutDelay
*/

// constants won't change. Used here to set a pin number:
const int ledPin =  7;// the number of the LED pin

// Variables will change:
int ledState = LOW;             // ledState used to set the LED

// Generally, you should use "unsigned long" for variables that hold time
// The value will quickly become too large for an int to store
unsigned long previousMillis = 0;        // will store last time LED was updated

// constants won't change:
const long interval = 4000;           // interval at which to blink (milliseconds)

void setup() {
  // set the digital pin as output:
  pinMode(ledPin, OUTPUT);
}

void loop() {
  // here is where you'd put code that needs to be running all the time.

  // check to see if it's time to blink the LED; that is, if the difference
  // between the current time and last time you blinked the LED is bigger than
  // the interval at which you want to blink the LED.
  unsigned long currentMillis = millis();

  if (currentMillis - previousMillis >= interval) {
    // save the last time you blinked the LED
    previousMillis = currentMillis;

    // if the LED is off turn it on and vice-versa:
    if (ledState == LOW) {
      ledState = HIGH;
    } else {
      ledState = LOW;
    }

    // set the LED with the ledState of the variable:
    digitalWrite(ledPin, ledState);
  }
}

Conclusion: The relay shield is interesting however some additional safety mods are really needed as one of the screw terminals is located to close to the metal USB connector on the Arduino!

Saturday, May 22, 2021

2021 May Mailbag

May 2021 Mailbag
As i received several items i decided to post this Aliexpress "2021 May Mailbag" already at 22 may 2021. However i am still expecting some more items and i expect some of it also will arrive in may also..   

Protective clips for laptop/smartphone camera.
DIY led lamp
Power on / off switch

Power off switch ( emergency stop switch )
Voltage meter indicator
Some more banana panel socket test probe binding post plug jack connect chassis parts
Arduino GPS shield with SD slot
AArduino relay shield
Another Arduino sensor shield
16 Channel ethernet shield 
pH meter DIY for Arduino 
CR2032 battery holders 


Tuesday, May 4, 2021

Fingerbot -1-


This blogpost is part 1 about the Moes Tuya Smart Bluetooth Fingerbot Button Pusher.  Recently i got the opportunity to buy for 0.01 Eurocent (including shipping) two of these devices on Moes Direct Store on AliExpress. The regular price  is just below 50 Euros, so this is a sponsored blogpost
I was exited to receive these two Fingerbots after 10 days.  The Fingerbot is just a small cube with an arm that can be used to push a button. A 'stándard usb to usb3 cable is included for charging. (The charger itself is not included). Also a toolpack is included with some connectors to use it e.g. for a rocker switch. As you can see on the photos all came in nice packaging.


Without a a special bridge it can communicate direct over Bluetooth with your phone. With a bridge it should be possible to use Alexa or Google home assistant to control it. This bridge was not included for 0.01 Euro and the standard price for it is around 16 euro.
In this blogpost you will find some photos to get an impression.
Connection with bluetooth using the app was easy. A download link for the app was easy found using the provided QR code. In the app are some configuration options. E.g. for setting the bop and bottom position of the moving arm, Selecting a use mode and setting the sustain time for a mode when on or off should move down the arm, waiting during a short interval time and moving up the arm again. Also you can place an icon with a direct link to the fingerbot op you android screen
ww


How good the Fingerbot would works also depends on how good you can glue it to the system what you want to control.  Some material is included to attach it to however I did not install a Fingerbot it yet.
Most electrical devices can be controlled another way so i did not find an immediate use case to push a switch. A use case  for me could be a more mechanical device like an aerosol air freshener, controlling ventilation, moving the plunger of a syringe.
Unfortunately the ventilation in my home needs a much bigger mechanical move than with the Fingerbot 'out of the box' is possible. Perhaps adding a lever would help, however that also increased the amount of force needed. If it would be easy possible to use it on the ventilation above my windows i perhaps would consider buying even some more.


Summary: Interesting device that i otherwise would not have bought as the current original price of around 25 Euro's is relative high.
After more testing i like to create a second post about this interesting device.

Sunday, April 25, 2021

2021 April Mailbag

Below a selection of items received recently in my 2021 April mailbag. (AliExpress )
Each items is below 22 Euro as i want to keep the complete order price below 22 euro to avoid additional tax and handling fees.

Breadboard wires
Finally i decided to buy some breadboard wires in a box.
I used Dupont wires or did cut some wires myself when breadboarding.
Let's check if this works better. 
Chassis parts tot banana's (also possible to clamp wires)

Perhaps later this year i will order more (perhaps the cheaper ones without possibility to clamp wires) as i have plans to incorporate them in a new workbench. However i expect it will take some time before i can realize that.
 

Dupont to crocodile clips
Some chips (cheap set to have some 7400 series SMD chips)
Never used the Kafuter brand before. After some recommendations in several YouTube channels i decided to buy some K-705
Cheap servo motors.
I still had some, however i wanted to have some more in stock.
Servo Motors
Main Adaptors
One nice thing of the design for this mains power plug converters is that you can plug in EU and US type power plugs.
Power plug converters to US power sockets and also one to an EU socket was included.
Always good to have some power supplies in stock for projects Mains 220V to 5V , 3V3 and 12V Power
Plastic Nuts & bolts I like these plastic nuts, bolts and distance holders.
I use them sometimes as spacers to put   PCBs on my table.
This UV curable liquid looked nice. When opening the package (not full opening, just to the plastic bag you see on the photo, is sensed a very strong bad smell. I even decided to put it outside of my house in my shed, hoping after some time the smell will go away so i can start playing with it.  UV liquid
Some tweezers for working with SMD components
Manual suction tool for SMD components
Another small weighing scale.
I was happy to give my first one to my family as they want it to use for bakery.
However i want one myself e.g. for counting components and experiments.
Cheap small temperature regulated USB soldering iron.
As i always wanted to have a portable soldering iron (USB). The temperature regulation and price was for me the most important selection criteria.
After receiving the soldering iron i ordered some spare tips and they arrived after some days.

Vibration sensors